Once we have learned the first rudiments on how to use operators to manipulate the values contained in the variables, we are not yet able to do anything concrete with them, apart from something basic using some electronic component (turn on a LED, acquire data from a sensor , drive a servo motor, etc.). For this reason we can use some instructions useful to control the flow of our programs, such as executing an instruction if the value acquired by a sensor falls below a set parameter, or executing an instruction for a certain number of times (what is called cycle in technical jargon).
Selection instructions
If statement
The if statement, also called conditional test, is designed to check if a certain condition occurs. Its syntax is as follows
if (<condition>)
{
    // code to execute if the condition is true
}
The block of statements that must be executed if the if test is true is enclosed in curly brackets. In reality, if the instruction to be executed is unique, it is possible to omit them, however for greater clarity it is a good idea to always insert the brackets and add indents to the code written inside them (in this case I used four spaces, but you can use for convenience also the tabulation character). The Arduino IDE automatically inserts the indent of the code and the closing parenthesis as soon as you type the opening brace (another good reason to always use them!). The rules for writing the body of instructions within if apply to all other instructions in an Arduino sketch, including the body of functions (which we will explore in a future article).
For example, if we wanted to verify that the value of a certain variable is greater than 5, we would have to write the following code:
int myVariable = 7;

if (myVariable> 5)
{
    Serial.println ("myVariable is greater than 5");
}
What happens if we assign the value 4 to myVariable?
If..else statement
Spesso un test condizionale non è sufficiente; potremmo ad esempio voler eseguire del codice se miaVariabile non è maggiore di 5. Possiamo quindi aggiungere al test condizionale un ramo else. In questo caso il codice assumerà l’aspetto seguente:
if (myVariable> 5)
{
     Serial.println ("myVariable is greater than 5");
}
else
{
     Serial.println ("myVariable is not greater than 5");
}
Try changing the value of my variable and trying to figure out which block of code will be executed.
If..if else..else statement
If a single else branch is not enough to manage the logic of our Arduino project, we can insert as many if..else if branches we want. For example, if we wanted to execute certain instructions in the event that myVariable falls within a certain range of values, we would write:
if (myVariable> = 0 && myVariable <= 5)
{
     // code executed if myVariable takes a value between 0 and 5
}
else if (myVariable> 5 && myVariable <= 10)
{
     // code executed if myVariable takes a value between 6 and 10
}
else
{
     // code executed in all other cases
}
Try adding as many else if branches as you can imagine.
Switch..case statement
Sometimes, when you have many conditions to test for single values taken by a variable, the if..else if..else statements can be cumbersome to use. In this case, the switch statement is much more agile. Let’s think, for example, of a numeric keypad from which it is possible to acquire numbers between zero and nine; with the switch..case statement, we can manage each key as follows:
switch (myVariable)
{
    case 0:
        Serial.println ("You pressed the 0 key");
        break;
    case 1:
        Serial.println ("You pressed key 1");
        break;
    case 2:
        Serial.println ("You pressed key 2");
        break;
    case 3:
        Serial.println ("You pressed key 3");
        break;
    case 4:
        Serial.println ("You pressed key 4");
        break;
    case 5:
        Serial.println ("You pressed key 5");
        break;
    case 6:
        Serial.println ("You pressed key 6");
        break;
    case 7:
        Serial.println ("You pressed key 7");
        break;
    case 8:
        Serial.println ("You pressed the 8 key");
        break;
    case 9:
        Serial.println ("You pressed the 9 key");
        break;
    default:
        Serial.println ("Key not recognized");
        break;
}
We have passed in round brackets to the switch statement myVariable; inside the switch body in curly brackets, the various case statements check from time to time if myVariable takes on the values 1, 2, … 9 and “divert” the flow of execution towards the code corresponding to the verified condition; if no case condition occurs, the code inside the default branch is executed. The break statement interrupts the flow of execution, preventing the compiler from testing all the other cases.
Also in this case try to change the value of myVariable and to imagine which branch case will be executed
You can group multiple cases to handle multiple conditions, with the following syntax:
switch (<condition>) {
    case <condition_1>:
    case <condition_2>:
    case <condition_3>:
    case <condition_4>:
    case <condition_5>:
        break;
}
As an exercise, the reader can try to convert the example code of the if..if else..else statement into a switch..case statement
Repeat instructions
As we mentioned in the introduction to this article, Arduino provides us with instructions to execute a certain number of times a block of code, also called iteration instructions or cycles.
While statement
The first basic iteration statement is the while loop, which will repeat the block of code within it until the condition passed in is met. The syntax of the command is as follows:
while (<condition>)
{
    // code to execute inside the loop
}
For example, let’s try to repeat a block of code 10 times:
// convenience variable that we will increment at each iteration
int index = 1;
while (index <= 10)
{
    // print the number of iterations on the serial monitor
    Serial.print ("Number Iteration");
    Serial.println (index);
    // increment the variable by one unit
    index ++;
}
In the final part of the cycle, the index variable is increased by one unit, so that at the tenth iteration the cycle is interrupted.
As an exercise, the reader try to imagine what happens by commenting on the line containing the index ++ statement.
For statement
An alternative to the while loop, very convenient if we already know the number of times a loop must be executed, is the for loop, whose syntax is as follows:
for (<index initialization>; <condition>; <increment>)
{
     // code executed at each iteration
}
where contains the declaration and initialization of an index variable similar to the example made for the while loop; is the condition that must be true to run the body of the cycle and is the index increment condition.
Try writing a for loop by replacing , , and with the corresponding statements used in the while loop example.
An example sketch of the execution flow control in Arduino
Now we are ready to write a test sketch, but not before having learned how to acquire an input from the serial monitor to have the possibility to change the value of a variable on the fly
Input acquisition from serial monitor in Arduino
To acquire an input from a serial monitor, you can use the instruction:
Serial.read ()which returns the first available byte of data. However, this first byte is treated by Arduino as an ASCII character, so if we typed for example 5, the corresponding number of the decimal system would be used, that is 53. We will therefore use an instruction that, having acquired the input from serial, converts it to an integer namely:
Serial.parseInt ()If we want to verify that incoming data is actually available, we can use the Serial.available () function in a conditional test:
if (Serial.available ())
{
    // code to execute if serial input can be read
}
Finally, here is a summary sketch of what has been said so far:
void setup () {
  // put your setup code here, to run once:
  Serial.begin (9600);
}

void loop () {
  // put your main code here, to run repeatedly:
  // we execute the code only if an input arrives from the serial
  if (Serial.available ()> 0)
  {
    int myVariable = Serial.parseInt ();

    Serial.print ("You entered the number");
    Serial.println (myVariable);

    if (myVariable> 5)
    {
        Serial.println ("myVariable is greater than 5");
    }
    delay (1000);

    if (myVariable> 5)
    {
        Serial.println ("myVariable is greater than 5");
    }
    else
    {
        Serial.println ("myVariable is not greater than 5");
    }
    delay (1000);

    if (myVariable> = 0 && myVariable <= 5)
    {
        // code executed if myVariable takes a value between 0 and 5
        Serial.println ("myVariable is between 0 and 5");
    }
    else if (myVariable> 5 && myVariable <= 10)
    {
        // code executed if myVariable takes a value between 6 and 10
        Serial.println ("myVariable is between 6 and 10");
    }
    else
    {
        // code executed in all other cases
        Serial.println ("myVariable is not between 0 and 10");
    }
    delay (1000);

    switch (myVariable)
    {
        case 0:
            Serial.println ("You pressed the 0 key");
            break;
        case 1:
            Serial.println ("You pressed key 1");
            break;
        case 2:
            Serial.println ("You pressed key 2");
            break;
        case 3:
            Serial.println ("You pressed key 3");
            break;
        case 4:
            Serial.println ("You pressed key 4");
            break;
        case 5:
            Serial.println ("You pressed key 5");
            break;
        case 6:
            Serial.println ("You pressed key 6");
            break;
        case 7:
            Serial.println ("You pressed key 7");
            break;
        case 8:
            Serial.println ("You pressed the 8 key");
            break;
        case 9:
            Serial.println ("You pressed the 9 key");
            break;
        default:
            Serial.println ("Key not recognized");
            break;
    }
    delay (1000);

    Serial.print ("You have chosen to repeat a while loop");
    Serial.print (myVariable);
    Serial.println ("times");

    int index = 1;
    while (index <= myVariable)
    {
        // print the number of iterations on the serial monitor
        Serial.print ("Iterating while number");
        Serial.println (index);
        // increment the variable by one unit
        index ++;
    }
    delay (1000);

    Serial.print ("You have chosen to repeat a for loop");
    Serial.print (myVariable);
    Serial.println ("times");

    for (int i = 1; i <= myVariable; i ++)
    {
        // print the number of iterations on the serial monitor
        Serial.print ("Iteration for number");
        Serial.println (i);
    }
    delay (10000);
  }
  else
  {
    Serial.println ("Please enter a number from 0 to 9");
    delay (3000);
  }
}
It should be noted that, in addition to having inserted the code in the loop () function, we have called the delay () function by passing it in input a certain number of milliseconds, corresponding to how long we want the flow of execution to stop, to avoid clogging the serial monitor.
For example, by typing 4 in the serial monitor input box and pressing enter or the “send” key, this is the output we will get:
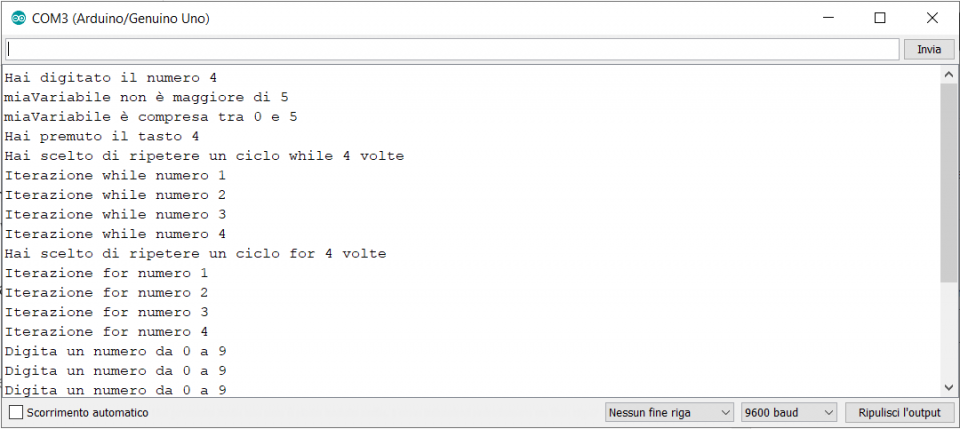
As you can see in the final lines of the monitor, the loop () instruction continues indefinitely to execute its body of instructions and, until a new input is available, the flow of execution will always end up in the second else branch. Feel free to experiment with various inputs to verify the output and modify the sketch as you prefer.
Note: the if statements found in the body of the main if are called nested if statements in jargon.
Conclusions
We have seen how to implement any conditional or iterative logic in our Arduino projects thanks to the execution flow control instructions. We were able to acquire serial inputs and, for the first time, we inserted some code into the Arduino loop () function.
We will soon see how to enclose blocks of code that we want to repeat in several places of a program within functions.