On many occasions it may arise the need to have a continuous and automatic distance measurement, such as in a sonar, or in an anti-intrusion system that activates an alarm when an intruder approaches a certain place, but also in the case of a robot who has to find the way out of a maze by juggling the walls.
Such objectives can be easily achieved with an ultrasonic sensor, of which we will see a working example in this article.
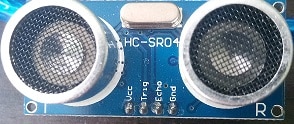
The ultrasonic sensor HC-SR04
To obtain a sufficiently precise distance measurement, we will use, as already mentioned, the ultrasonic sensor HC-SR04, which is able to emit a signal waiting for the echo and measuring the time interval between emission and reception of the signal itself.
The sensor returns data in the form of variable width pulses with a range of values ranging from 2 centimeters to 4 meters, with an accuracy that can reach 3 mm.
The formula for converting the time of the ultrasonic sensor signal into centimeters
Since the sensor does not directly return the value of the distance measurement from the object towards which it launches the outward signal, but only the time taken by the signal to return to the sensor, it will be necessary to create a conversion function. In fact, since the signal emitted is nothing more than a 4 kHz sound and given that the sound travels at a speed of 343 meters per second, we will divide the time interval measured by the microseconds it takes to travel one centimeter (i.e. 29.155 which for convenience we will round to 29). The conversion formula will then be as follows:
microseconds / 29 / 2;We divide by 2 for the simple fact that the measurement time is doubled by the round trip of the signal.
Sample materials and circuit
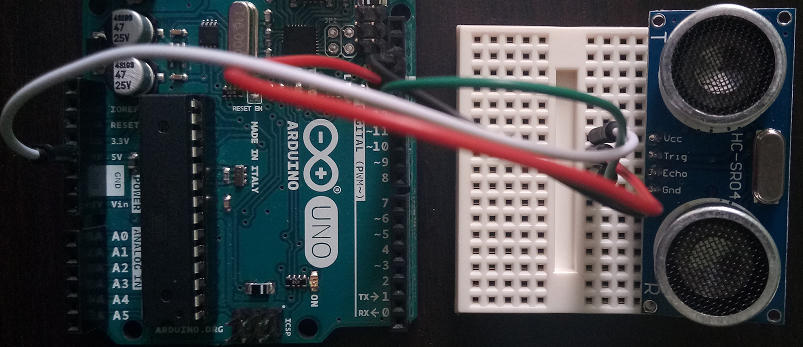
For the Arduino distance measurement prototype we will need:
- 4 jumper cables of different colors
- a breadboard
- an Arduino board
- a usb cable to connect Arduino to the computer
The sensor is provided with four pins of which we will connect the Gnd to an Arduino ground pin, the Vcc to the 5V pin, the Echo pin to digital pin 12 and the Trigger pin to pin 13.
The Trigger pin will be set in output, as it takes care of sending the signal to the object from which to measure the distance, while the Echo pin will listen for the return signal, responding with a HIGH pulse of the same duration as the pulse sent by the HC-SR04 module (exactly eight waves at 4kHz).
The test sketch
Here is the listing to manage temperature measurement with Arduino and an ultrasonic sensor:
#define PIN_TRIGGER 13
#define PIN_ECHO 12

void setup () {
  // put your setup code here, to run once:
  Serial.begin (9600);

  pinMode (PIN_ECHO, INPUT);
  pinMode (PIN_TRIGGER, OUTPUT);

}

void loop () {
  // put your main code here, to run repeatedly:
  digitalWrite (PIN_TRIGGER, LOW);
  digitalWrite (PIN_TRIGGER, HIGH);
  delayMicroseconds (10);
  digitalWrite (PIN_TRIGGER, LOW);

  const unsigned long duration = pulseIn (PIN_ECHO, HIGH);
  if (duration == 0) {
    Serial.println ("Impossible to acquire the impulse from the sensor");
  }
  else {
    Serial.print ("Distance to nearest object:");
    Serial.print (convertMicrosecondsInCm (duration));
    Serial.println ("cm");
  }
  delay (2500);
}

unsigned long convertMicrosecondsToCm (const unsigned long microseconds) {
  return microseconds / 29/2;
}
As you can see, we define pins 13 and 12 as Trigger and Echo pins respectively; subsequently in the setup function, after having set a baud rate of 9600 for the communication on the serial port, we set the Echo pin in input, as already mentioned, and the Trigger pin in output.
In the Arduino loop, we configure the initial state of the echo pin by waiting a few microseconds; in this way the presence of correct HIGH pulses is guaranteed in subsequent measurements, eliminating any voltage peaks to which the electrical signals are always subject.
At this point we are ready to measure the round trip interval of the signal using the Arduino pulseIn function, which takes among its arguments the pin from which to read the pulse duration (the echo pin, in fact), the type pulse to be read (in this case HIGH) and the timeout, which in this case is not used, being an optional parameter set by default to one second.
Finally, if the duration is purchased, we convert its value into centimeters, using the function convertMicrosecondiInCm whose formula we have seen above in this article; if, on the other hand, the flow of execution enters the first branch if, we print on the monitor the impossibility of acquiring data from the sensor. Const and unsigned values are used, both to improve the readability of the program and to reduce its size
Conclusions
In this article we have analyzed how it is possible to use an ultrasonic sensor to measure the distance to an object. Since the sensor measures a round-trip time interval of the signal it emits, we have seen how to convert its output values in cm. We used long type values, sufficient for an approximate measurement, whose accuracy however can be improved by using the float type, but also with a temperature sensor, since the HC-SR04 module is sensitive to temperatures, which will be an argument for a future article.