Let’s start the discussion of sensor management with Arduino with a very easy to use component, the DHT11 sensor, thanks to which we will print the environmental temperature and humidity data on the serial monitor. The uses of the sensor are not limited to those of a classic weather station, but range from simple data loggers to automatic adjustment systems (a temperature sensor can be used for example to improve the accuracy of a proximity sensor) up to systems more or less complex domestic and industrial monitoring. All this thanks to the fact that the sensor allows a connection up to 20 meters and guarantees a certain accuracy, as well as being particularly economical. In this article we will also see how to use a ready-made class library to control it (a library is a collection of code composed of functions and classes, reusable in multiple projects).
The DHT11 sensor
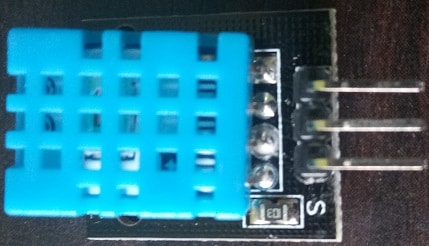
The DHT11 is a digital sensor that is made up of a quadrangular casing (usually blue or white) and four output pins (of which only three are useful). Inside there are:
- an NTC thermistor which has the purpose of measuring the temperature by varying the value of a resistance; its acronym stands for Negative Temperature Coefficient; in practice, the resistance value decreases as the temperature increases, the measurable range of which is allowed from 0 ° C to 50 ° C
- a pair of electrodes for the detection of relative humidity (i.e. the quantity of water present in the air with respect to the temperature): through a substrate that retains humidity, the resistance between them is determined: the lower the resistance value, the higher the relative humidity
In the example circuit we will use a DHT11 sensor already soldered to an integrated circuit (in jargon also called breakout board), which facilitates its use, since it has the three pins useful for connection with the sensor and already contains a resistor for the connections to a distance of less than 20 meters:
Sample materials and circuit
To create a DHT11 sensor management prototype with Arduino, we will need:
- a DHT11 sensor
- 3 jumper cables of different colors
- a breadboard
- an Arduino Uno board
- a usb cable to connect the Arduino Uno board to the computer
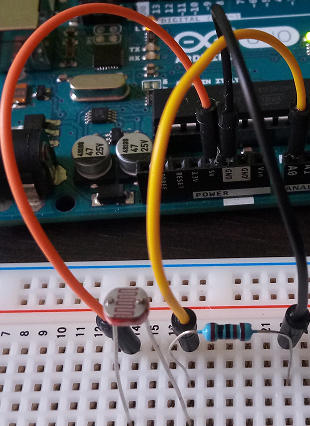
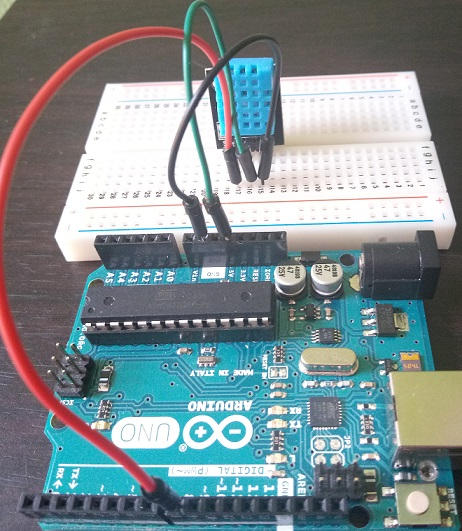
We then insert the three pins of the DHT11 into three holes in the center of the breadboard. In the photo below you can see that the red jumper cable has been connected to the Arduino digital pin 8 and to the outermost pin on the left of the sensor brekout board, while the green cable connects the central pin to the 5v pin of Arduino and, finally, the pin on the right has been connected to the GND ground pin.
The SimpleDHT11 library
To focus on the logic of the prototype, we will use, as already mentioned, a ready-to-use class library, namely SimpleDHT, which also manages the DHT22 sensor. We will deal in detail with everything related to object-oriented programming (OOP) with Arduino and the creation of libraries in a future article; in the meantime we can familiarize ourselves with the terminology of this development paradigm, noting that with the code we will import we will be able to use an object of type SimpleDHT11 which exposes the read function which takes three parameters as input by reference:
- ptemperature of byte type, in which to record the temperature values read by the sensor
- phumidity of byte type, in which to record the humidity values read by the sensor
- pdata of array type of 5 byte elements containing the raw bits read by the sensor
Try browsing the repository code you just linked, both the library and the examples, to get familiar with open source projects.
Library installation
To use the library just go to the Sketch menu -> #include library -> Library manager; a popup window will open with a search filter in which we will enter the key “SimpleDHT” as shown in the screenshot:
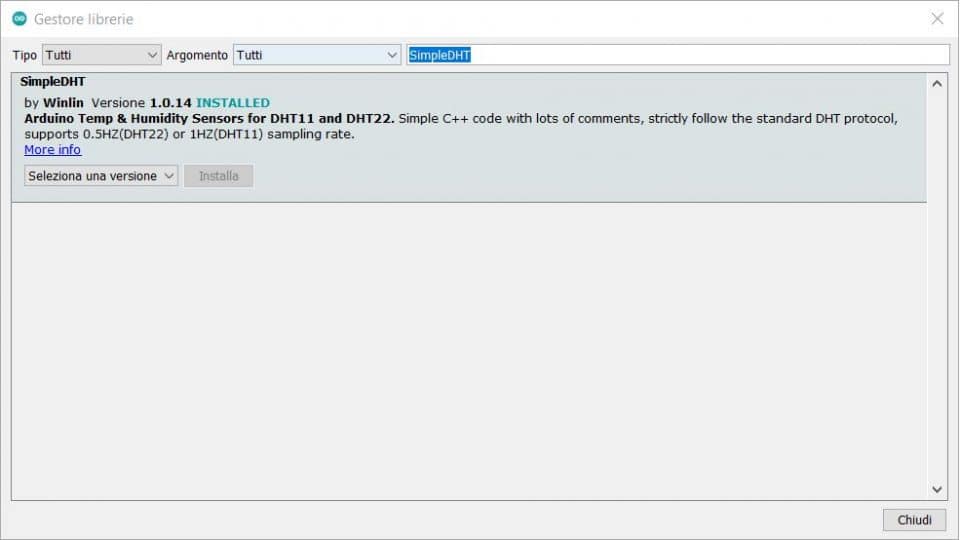
In this guide I have selected the latest version included in the Arduino 1.8.13 ide, 1.0.13. By clicking on the install button, the window closes, inserting the following line of code at the top of the sketch:
#include <SimpleDHT.h>which instructs the Arduino compiler to include the SimpleDHT11 library code.
The example sketch
In this example I decided to rework, simplify it, the example created by the developer of the repository to also manage any sensor errors and print out some data on the communication between Arduino and DHT11. Let’s see the sketch code immediately:
#include <SimpleDHT.h>

#define DHT11_PIN 8

SimpleDHT11 dht11 (DHT11_PIN);

void setup () {
  Serial.begin (9600);
}

void loop () {

  int counter = 0;
  int counterError = 0;

  while (true) {
    counter ++;

    byte temperature, humidity;

    int error = dht11.read (& temperature, & humidity, NULL);

    if (error! = SimpleDHTErrSuccess) {

      Serial.print ("Error reading DHT11 sensor:");

      Serial.print (SimpleDHTErrCode (error));
      Serial.print (",");
      Serial.print (SimpleDHTErrDuration (error));

      counterErrors ++;

    }
    else {

      Serial.print ("Temperature:");

      Serial.print ((int) temperature);
      Serial.print ("° C,");

      Serial.print ("humidity:");
      Serial.print ((int) humidity);
      Serial.print ("%");
    }

    Serial.print (", total:");
    Serial.print (counter);

    Serial.print (", errors:");
    Serial.print (error counter);

    float percentageSuccess = (counter - counterErrors) * 100.0 / (float) counter;

    Serial.print (", success%:");
    Serial.print (percentageSuccess);
    Serial.println ("%");

    delay (1500);
  }
}
The DHT11_PIN constant is immediately defined to manage the Arduino digital pin 8 and, subsequently, a SimpleDHT11 type object is created to which the pin is passed. After initializing the serial communication in the setup function, the counter and counterErrors variables are created in loop with which we will keep track of the number of readings made and the number of errors that occurred during the sensor reading. An infinite while loop is then started (given that we pass as a True condition without any other end-of-loop instruction) by adding a unit to the counter variable at each iteration.
After declaring the temperature and humidity variables, we pass them by reference to the read method of the dht11 object. The read function outputs an integer that we can use to understand if the reading was successful. In fact, at line 43 of the SimpleDHT.h file of the library you will find the following declaration:
// Success.
#define SimpleDHTErrSuccess 0
Therefore, if the value of the error variable is equal to SimpleDHTErrSuccess, the reading was successful and, therefore, the humidity and temperature values can be printed on the serial monitor; otherwise, by passing the error value to objects of type SimpleDHTErrCode and SimpleDHTErrDuration, it is possible to know the type of error occurred and the duration.
At the end of the cycle, we obtain the overall success rate of the reads with a simple expression.
Conclusion
In this article we have seen how to control the DHT11 humidity and temperature sensor with Arduino. We briefly described the characteristics of the sensor and took advantage of the sample project to verify how easy it is to use third-party libraries that address all the low-level details for communicating with sensors and other hardware. We have also begun to familiarize ourselves with classes and objects that will be discussed in depth in a future article.