In the sketches of the previous articles we have seen some examples of functions, whose usefulness we appreciated in carrying out some processing, without dwelling too much on their internal behavior.
In particular, in addition to the well-known Arduino setup and loop functions, we have seen how to generate random numbers with the random function or how to manage analog pins with analoWrite.
In this article we will discuss in more detail how to create our functions with Arduino and we will try to understand why they are useful and why they improve the quality of our sketches.
Function as a subroutine
The functions we have used so far, such as eg. pinMode, digitalRead and digitalWrite (in addition to those already mentioned in the introduction), in a certain sense constituted a sort of black box which, given certain inputs, returns certain values to the output; moreover we have invoked them as often as we needed. This shows the role of the function as a sub-program within the main program: basically a block of instructions is encapsulated that can solve common problems and, instead of rewriting the same lines of code each time, we proceed to a call to the function that contains them.
The advantages of such an approach are:
- reuse of code: once a function has been created, it can be reused as many times as you want; if it is collected in a function library, its usefulness extends beyond the single sketch;
- program maintainability: by isolating a set of instructions in a function, correction of errors and / or modifications of its behavior must be made in one place, with a considerable saving of time
- testability: performing tests in a program consisting of several functions is easier than on a source with the same code repeated many times or in several files
- productivity: reusing previously written functions greatly speeds up code writing, since it is no longer necessary to rewrite them
Declaration of a function
Declaring a function in Arduino is very simple. The syntax is as follows:
<return_value type> function_name (<param_1, ..., param_n) {

    // statement block of the function
    return <value>;
}
You declare a function by giving it a name after specifying the type of the return value; any parameters, also called function arguments, are declared in round brackets; finally, the code inside the function itself is inserted between curly brackets, which can perform some processing also using the parameters passed in input. The return statement returns any results of these processing to the caller.
Note: it is very important to give meaningful names to a function, so that you understand at a glance what it is used for.
Void functions
Functions that do not return any values are declared with the type void, indicating that the return value is empty. For example:
void print Hello () {
    // call Serial.println to print "hello" on the serial monitor
    Serial.println ("Hello!");
} // end of statement block
We have declared a function of type void with no arguments, called printHello and inside it we called Serial.println to print a string on the serial monitor. The function does not return anything, so it was not necessary to put the return keyword at the end of the statement block.
Not very useful to tell the truth; we will appreciate later when, if necessary, it is good to enclose a set of instructions in a void function, but two examples we have often encountered are setups and loops, without which Arduino cannot basically do anything.
Functions with return values
A function with a return value must contain within it one u more calls to the return statement, which must return to the caller a value of the same type as the function. Let’s see some very simple examples of non-void functions:
int returnRandomInt () {
    // returns a random integer between one and ten
    return random (1, 10);
}

char returnRandomCar () {
    // returns a random character between a and z
    return (char) random (97, 122);
}

bool returnRandomBool () {
    // call the returnRandomInt function and cast it to the bool type
    return (bool) returnRandomInt ();
}
The first example is interesting, because inside the returnRandomInt function, we execute another call to the random function of the Arduino library, and we do it directly in the return, without assigning the value to a convenient variable. In the second example, however, we get a random number from the ASCII character set representing the lowercase letters of the alphabet, and cast a to the char type before returning the value obtained. Finally, another interesting example, let’s call the first function we declared inside returnRandomBool; since any value greater than zero for Arduino assumes the meaning of TRUE, if the returnRandomInt function generates zero, false will be returned, otherwise true.
Try un-cast in the last two functions and explain what happens.
Scope of variables
We have not made use of variables so far. The latter have two domains, local and global; in general, a local variable can only be used inside the function block, while a global variable also outside it. The scope (or scope) of a variable can have multiple nesting layers, that is, a local variable can in turn be global with respect to the outermost block of instructions. Let’s see an example to better understand:
// global variable
int a = 0;

void scope1 () {
     // local variable at scope1
     int a = 1;
     Serial.println ("scope1:");
     Serial.println (a);
}

void scope2 () {

     // local variable with scope2
     int a = 2;
     Serial.println ("scope2:");
     Serial.println (a);

     scope1 ();
}

void scope3 () {

     // local variable to scope3
     int a = 3;
     Serial.println ("scope3:");
     Serial.println (a);

     scope2 ();
}

void testAbitiVariabile () {
     scope3 ();
     Serial.println ("global scope:");
     Serial.println (a);
}
We have declared an integer variable named a in the global scope; we then inserted the same variable declaration into three different functions, printing its value on the serial monitor. In each function a call to the previous function has been inserted and, finally, in testAmbitiVariabile we have printed the outermost global variable,
Tried to understand what the program output is before loading the final example sketch on your Arduino.
Passing parameters
As we have already anticipated, a function can receive some values as input, through the arguments of the function itself. Two types of parameters can be passed to an Arduino function
- by value
- for reference
Passing by value
When passing parameters by value to a function, a copy of the value itself is created within the local scope. When control is returned to the caller, the copies are destroyed without the initial value of the variables passed in being changed. Let’s see an example:
int x = 5;
int y = 18;
void reassignValues (int x, int y) {
// we reassign the values of x and y
x = 43;
y = 61;
Serial.print ("x:");
Serial.println (x);
Serial.print ("y:");
Serial.println (y);
}
reassignValues (x, y);
Serial.print ("x:");
Serial.println (x);
Serial.print ("y:");
Serial.println (y);We declared the variables x and y before the reassignValues function. Within this, we assigned new values to x and y and printed them on the screen. Finally, after the call to reassign values with parameter passing, we reprinted x and y.
What values do x and y take each time?
Pass by reference
Unlike the previous case, passing the values by reference, the function can modify the parameters passed in input. This happens because the reference is nothing more than the memory location of the variable and not a copy of it, so any change in one is reflected in the other. An argument passed by reference must be declared with the & just before the name. Let’s rewrite the previous previous example using arguments for reference:
int x = 5;
int y = 18;
void reassignsValues (int & x, int & y) {
// we reassign the values of x and y
x = 43;
y = 61;
Serial.print ("x:");
Serial.println (x);
Serial.print ("y:");
Serial.println (y);
}
reassignValues (x, y);
Serial.print ("x:");
Serial.println (x);
Serial.print ("y:");
Serial.println (y);
What are the differences from the previous paragraph?Passing an array to a function
It is also possible to pass an array to a function, however, in this case, a pointer to the address of the first element of the array is actually passed behind the scenes. We will see later the pointers, a very powerful tool that allows us to optimize the code for Arduino, directly managing its memory. But since this is an advanced topic, let’s just look at an example of passing an array to a function:
const int DIM = 26;

char letters [DIM];

void createAlphabet (char vector []) {
    for (int i = 0; i <DIM; i ++) {
        int character = i + 65;
        letters [i] = character;
    }
}

createAlphabet (letters);

Serial.println ("Alphabet:");
for (int i = 0; i <DIM; i ++) {
    Serial.print (letters [i]);
}
We have declared the constant DIM, to determine the size of an array of characters called the alphabet. The createAlphabet function is then declared to which the vector argument of the character array type is passed. Within the function, the array is populated with ASCII characters representing the capital letters of the alphabet. Finally we call the function itself passing the reference to the first element of the letters array and we print the values on the screen with a for loop, demonstrating that the elements of the vector have been modified by creaAlfabeto and that it was not a copy that was passed as a parameter.
An example sketch
We can collect all the above examples in one program; the only thing we have to do is collect the declaration of functions outside setup and loops, as well as the declaration of global variables. As usual, we initialize the serial to print the results on the screen and call the functions inside setup, so that they are executed only once (press the Arduino reset button to re-run the sketch).
// global variablesi
const int DIM = 26;
char letters [DIM];
int a = 0;
void print Hello () {
// call Serial.println to print "hello" on the serial monitor
Serial.println ("Hello!");
} // end of statement block
int returnRandomInt () {
// returns a random integer between one and ten
return random (1, 10);
}
char returnRandomCar () {
// returns a random character between a and z
return (char) random (97, 122);
}
bool returnRandomBool () {
// call the returnRandomInt function and cast it to the bool type
return (bool) returnRandomInt ();
}
void scope1 () {
// local variable at scope1
int a = 1;
Serial.print ("scope1:");
Serial.println (a);
}
void scope2 () {
// local variable with scope2
int a = 2;
Serial.print ("scope2:");
Serial.println (a);
scope1 ();
}
void scope3 () {
// local variable to scope3
int a = 3;
Serial.print ("scope3:");
Serial.println (a);
scope2 ();
}
void testAmbiVariabile () {
scope3 ();
Serial.print ("global scope:");
Serial.println (a);
}
void reassignValues (int x, int y) {
// we reassign the values of x and y
x = 43;
y = 61;
Serial.print ("x:");
Serial.println (x);
Serial.print ("y:");
Serial.println (y);
}
void reassignValuesPerRef (int & x, int & y) {
// we reassign the values of x and y
x = 43;
y = 61;
Serial.print ("x:");
Serial.println (x);
Serial.print ("y:");
Serial.println (y);
}
void createAlphabet (char vector []) {
for (int i = 0; i <DIM; i ++) {
int character = i + 65;
letters [i] = character;
}
}
void setup () {
// put your setup code here, to run once:
Serial.begin (9600);
press Hello ();
Serial.print ("returnRandomInt:");
Serial.println (returnRandomInt ());
Serial.print ("returnRandomCar:");
Serial.println (returnRandomCar ());
Serial.print ("returnRandomBool:");
Serial.println (returnRandomBool ());
testAbitiVariabile ();
int x = 5;
int y = 18;
reassignValues (x, y);
Serial.print ("x:");
Serial.println (x);
Serial.print ("y:");
Serial.println (y);
reassignValuesForRef (x, y);
Serial.print ("x:");
Serial.println (x);
Serial.print ("y:");
Serial.println (y);
createAlphabet (letters);
Serial.print ("Alphabet:");
for (int i = 0; i <DIM; i ++) {
Serial.print (letters [i]);
}
}
void loop () {
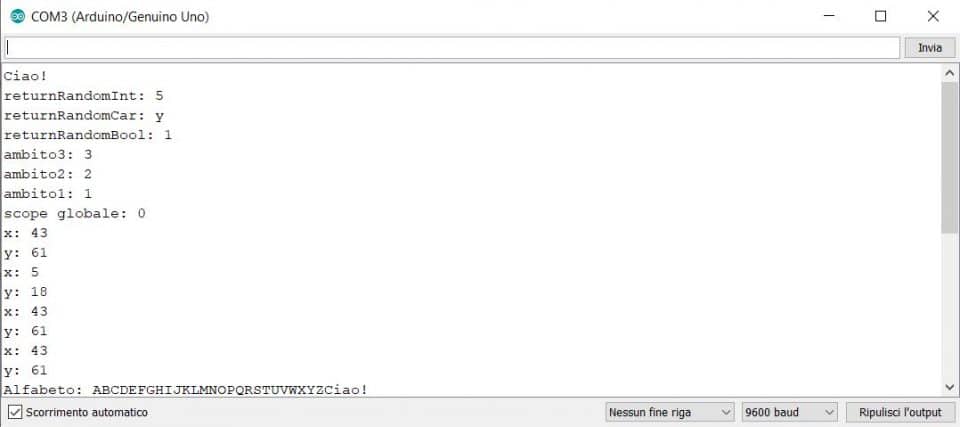
// put your main code here, to run repeatedly:
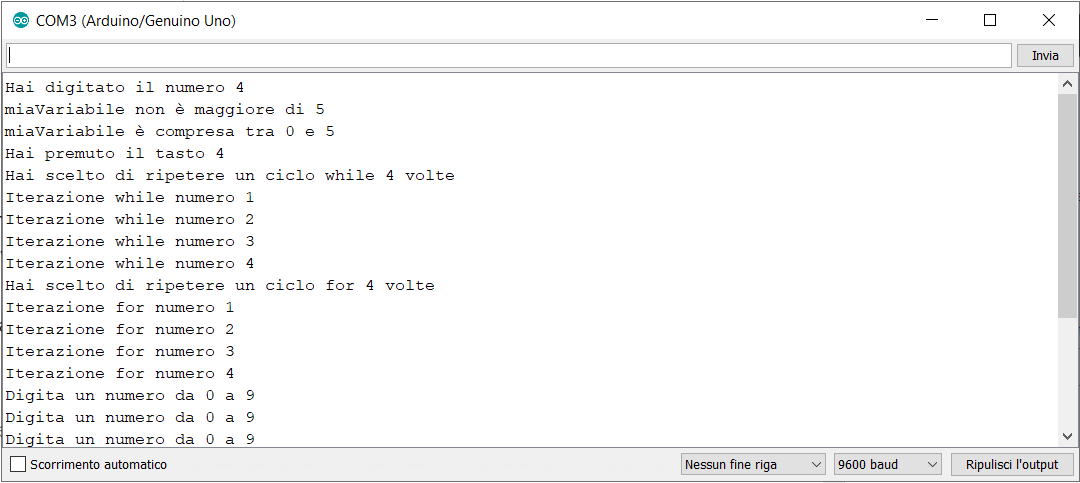
}And here is the output of the listing on the serial monitor:
Try to figure out if any instructions that have been written multiple times in the setup can be encapsulated in a function. If the answer is no, try to explain why. Where you see fit, insert other printout instructions on the screen to make the call output clearer.
Conclusions
In this article we have seen what functions are, what they are for and why it is important to declare them as soon as possible in our Arduino projects. In the following guides we will touch their usefulness first hand, when we will have to recalculate the values returned by some sensors based on certain conversion formulas.